

The Mercuna middleware is integrated into Unreal Engine as a standard plugin compatible with Unreal Engine 5.4 or later.
If you have also licensed Mercuna 3D Navigation, then the plugin will provide both ground and 3D navigation capability. See the Mercuna 3D Navigation User Guide for documentation of the 3D Navigation capabilities.
If you have licensed Mercuna Any Surface Navigation, the plugin will also provide navigation on walls and ceilings. See Mercuna Any Surface Navigation User Guide for documentation of the additional navigation capabilities.
Once installed, the Mercuna components, actors and menu will automatically be available when you next start the editor.
Mercuna Ground Navigation enables path finding and following for pre-configured agent types. There is no restriction on the number of agent types. The settings of these agent types must be set up on a per-project basis.
In the UE5 editor, under Edit | Project Settings… | Plugins | Mercuna you will find Ground Agent Types. These specify the settings for the different kinds of agents that will navigate using Mercuna Ground navigation.
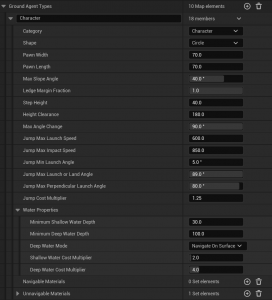
The settings of these agent types change the generation of the Nav Ground Grid (see later) which marks the areas of the geometry over which your agent may travel. These settings are:
The agent category controls whether the agent is allowed to turn on the spot, and how edges of physical materials with different friction are considered.
Characters are allowed to turn on the spot, so a standard A* pathfinder is used to find the shortest path to the character’s destination regardless of how sharp the turns required are. Path smoothing is still applied so characters will avoid making sharp turns when there is space available to do so.
Animals prefer not to turn on the spot, so Mercuna’s kinematic pathfinder is used. This means that animals will prefer to take corners in smooth arcs even if there is a shorter route that requires a sharp turn available. However, if there is no alternative the animal is able to turn on the spot.
Vehicles can’t turn on the spot. Mercuna’s kinematic pathfinder is used, but if the only route to a destination requires a turn sharper than the vehicle’s minimum turning radius, then no path will be found.
Additionally, for vehicles the available surface friction is considered at the sides of the agent shape, to account for the positioning of the vehicle’s tyres.
The agent category also determines the way in which the navigation component for navigating pawns can be configured, presenting options appropriate for that type of agent.
A Mercuna Nav Ground Grid provides a graph for characters, animals, and vehicles of the areas that they are allowed to navigate. It uses a hybrid structure combining a grid and a polymesh, leveraging the strengths of both representations.
At the core of the system is a quadtree that accurately represents the navigable surfaces in the world. This serves as the authoritative source for navigability and provides fast look up of spatial position. From this, a polymesh is built to summarise the quadtree data and enable efficient navigation searches, such as pathfinding.

A nav grid is created by placing a Mercuna Nav Ground Grid actor into the world. The nav grid is automatically generated throughout all areas covered by Mercuna Nav Grid Volumes assigned to that grid.
The Mercuna Nav Ground Grid actor exposes a number of properties to control how the grid is generated and which features are enabled.
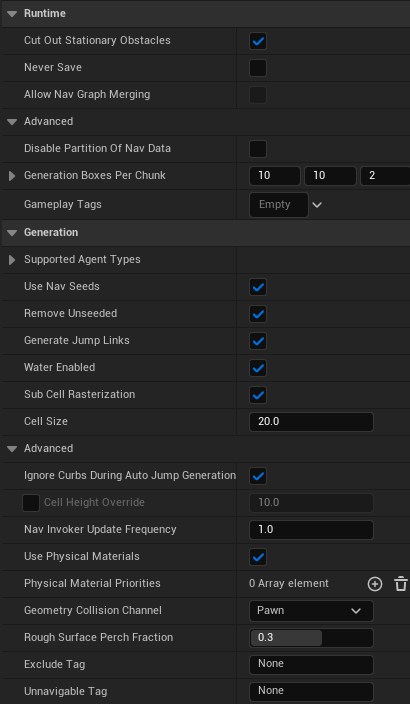
A Nav Grid can simultaneously support multiple agent types, controlled by the Supported Agent Types setting. Create agent types in the project settings, as detailed above.
Use Nav Seeds controls whether nav seeds are required. If switched off then unreachable areas aren’t removed from the nav grid, increasing memory usage.
Remove Unseeded controls whether unseeded parts of the nav graph are removed. This only applies if Use Nav Seeds is enabled. See below for more information.
Generate Jump Links controls whether jump links should be automatically generated for this mesh. If true then an additional post-processing step is introduced, increasing peak memory usage during the build and increasing build times.
Water Enabled controls whether water should be considered whether generating the navigation grid. See water for more details.
Sub Cell Rasterization controls whether the nav grid build process uses a higher resolution grid, breaking each cell into a 4×4 grid of sub cells. Using sub cell rasterization results in a more accurate nav grid but increases build time. Disabling this when using large cell size and large max slope angle, with a small step size can result in vertical breaks in the nav mesh, as changes in geometry height are misidentified as unnavigable steps. To make sure this does not happen when sub cell rasterization is disabled, ensure (CellSize * tan(MaxSlopeAngle) / StepHeight) is less than 0.75
Cell Size sets the resolution of the Nav Grid which Mercuna will use to find paths for agents. Using a smaller cell size will allow a more accurate representation of the navigable space, but more memory will be consumed and pathfinds will take longer. As a guide, we suggest setting cell size to half the width of your narrowest agent.
If you have agents of very different sizes, it can be more efficient to use a second nav grid with a larger cell size for the larger agents. We recommend that the largest agent using a nav grid should be no bigger than three times the size of the smallest agent.
Note that agents must not be more than 63 cells wide or long. If an agent type is used with a nav grid that has too small a cell size, a warning will be logged and the cell size will be automatically increased.
Ignore Curbs During Automatic Jump Link Generation controls whether to ignore curbs below cell resolution, and uncertainty due to cell resolution when automatically generating jumps. Having this option enabled allows jumps to be generated with lower minimum launch angles. If this option is disabled, minimum launch angles will be automatically set to a higher value based on cell width and height. If this option is enabled and the Shrink Capsule During Auto Jumps option is enabled on the ground navigation component of an agent, the agent’s capsule will be automatically shrunk by the size of a cell during automatic jump following to avoid clipping geometry on launch. If a manual jump link following callback is supplied, that may need to perform a similar correction.
Nav Invoker Frequency is only used if the nav grid is being used with nav invokers, and controls how often the nav grid should be updated as the invokers move around.
Use Physical Materials controls whether surface type information from Physical Materials is recorded in the Nav Grid. This information can then be used to guide or limit pathfind searches, as discussed below.
The Physical Material Priorities are discussed below.
The Geometry Collision Channel specifies the collision channel used to query whether geometry should be considered for navigation by this nav grid. For a collider to be considered by navigation it must have “Can Ever Affect Navigation” set to true, and give a Block response to this collision channel.
The Rough Surface Perch Fraction allows control of perching over rough surfaces, marking small non-vertical deviations in geometry navigable. The value is expressed as a fraction of the agent radius. Increasing the value causes the nav graph to cover a larger area, but may result in some areas being incorrectly considered navigable.
The Exclude Tag is an optional tag that can be used to exclude specific actors from the nav grid. Any actor (or component) that has a matching tag set on it won’t be considered as geometry that blocks navigation. This tag does not work for brushes.
The Unnavigable Tag is an optional tag that can be used to mark specific actors as non-navigable in the nav grid. Navigation will not be allowed on the mesh of any actor (or component) that has a matching tag set, but the geometry of that mesh is still considered by navigation. This tag does not work for brushes.
If Cut Out Stationary Obstacles is set then stationary obstacles are cut out of the nav graph so that paths will go around them. This stops obstacles from being treated as dynamic obstacles when stationary (see Stationary Obstacles below).
The Never Save property indicates whether the nav grid will be built from procedurally generated data at runtime, so any navigation data generated in the editor should not be saved (see Runtime Grid Building below).
Allow Nav Graph Merging enables this nav grid to merge with other nav grids at runtime and allow continuous navigation between them.
Disable Partition of Nav Data (UE5 only) stops a nav graph being split up into chunks in world partition maps. This should only be used if you don’t want sections of the nav grid streamed in and out but want the entire nav grid always loaded.
Generation Boxes per Chunk controls the size of data chunks. In a World Partition map when dividing the navigation data into chunk actors, this is how large each chunk should be in terms of generation boxes. A larger size will reduce the amount of graph merging that needs to take place at runtime but increase the memory usage as more of the graph will be resident in memory.
Gameplay Tags are arbitrary user tags that are applied to the nav grid. These can be used with modifier volumes or seeds to exclude particular grids by tag.
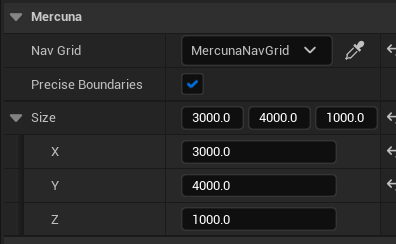
To set up a nav volume, first add a Mercuna Nav Grid Volume actor into the level, and size it as required. Only boxes are supported, so to describe more complex boundaries of the navigable area, multiple Nav Grid Volumes can be configured.
If Precise Boundaries is switched on, the boundaries of the nav grid volume are considered hard edges, beyond which your agents can’t move. However, if the Precise Boundaries option is turned off then navigable space will extend up to a high power of 2 boundary in the quad-tree. This allows a memory saving when there is open space around the navigable area and you don’t need to precisely specify the edge of the area your agents will move within.
The grid generation parameters to be used in this level are configured on the Mercuna Nav Ground Grid actor, and on the Agent Types set in the project settings. Upon creation, the parameters are set to default values. These defaults can be modified in the Mercuna project settings.
In order to identify which regions should be considered navigable, Mercuna requires you to place Mercuna Nav Seed actors into levels. This allows uninteresting regions, such as the small isolated areas inside hollow geometry or large areas outside of the level boundaries, to be excluded and avoids pawn positions getting clamped into disconnected regions.
A Mercuna Nav Seed needs to be placed on or above the ground in the area of the level where pawns will navigate. This seed is used during construction of the nav grid to find all connected reachable cells, by flood filling the region starting at the nav seed. Any area not connected to the seed will be considered unnavigable. If you have multiple disconnected areas in your level where you expect pawns to move, a seed must be placed in each separate area.
Nav Seeds are disabled if Use Nav Seeds is off on the Nav Grid, or when using Nav Invokers to generate the nav grid. In this case unreachable regions of the nav grid aren’t culled, increasing memory usage – but this means that these regions can easily be connected by nav grid rebuild.
By default, Nav Seeds are applied to all nav graphs (including Nav Octrees and Nav Surface Grids if you also have Mercuna 3D Navigation or Mercuna Any Surface Navigation). To restrict them to particular graphs, you can either assign them to only apply to a specific graph or use a gameplay tag query to limit them to only graphs with tags that satisfy the query.
When nav seeds are in use, regions not reachable from any seed are normally stripped from the nav graph to reduce memory usage. You can choose to retain these unseeded regions by disabling the Remove Unseeded option in the nav grid generation settings.
This can be useful in two cases:
Unseeded nav graph regions are treated as non-navigable. They are excluded from all navigation queries and are not shown in debug draw by default. You can visualize them by enabling the Draw Unseeded option on the Nav Grid actor.
If unseeded parts of the nav graph are kept during development (e.g., for World Partition support) but are not needed in the final build, it can be stripped out during cooking to reduce memory usage.
This behavior is controlled by the Remove Unseeded Nav Graph Data on Cook setting in the Mercuna Plugin Project Settings.
A particular box volume can be completely excluded from navigable space by adding a Mercuna Nav Exclusion Volume actor to the level. By default the exclusion volume will be applied to all nav grids (and all nav octrees if you also have Mercuna 3D Navigation).
If you have multiple nav grids in a level, and only want the exclusion volume to apply to one of them, then you can explicitly specify which grid the exclusion volume is linked to via the volume’s properties.
The ExclusionType property controls whether the exclusion is for the nav grid, for auto-generated jump links, or both. The exclusion volume may be rotated and scaled.
Unless runtime generation is being used, the Nav Grid must be built after it is first configured and any time the level geometry is changed. This can be done by selecting Build Grid from the Mercuna menu (accessed by clicking the Mercuna button in the Toolbar). An on screen notification displays the progress of the nav grid construction.
If full Mercuna logging is enabled (see Logging section below), then you will see the generation progress for each nav grid in the output log, and the total memory consumption of the grid is reported.
If you wish to automate the building of the Nav Grids, for example as part of a job run regularly each night, the grids can be built using the MercunaNavGraphBuilderCommandlet. This can be run from the command line using:
UnrealEditor.exe ProjectName.uproject MapName -run=MercunaNavGraphBuilderCommandlet [-AlwaysBuild]
By default only grids that have been saved as dirty will be rebuilt and resaved, however you can force all grids to be built using the AlwaysBuild switch.
An optional parameter “-MAP=Map1+Map2+…” maybe used to build multiple maps with a single command”
The main influences on memory usage and performance are:
Mercuna can be run in a number of different threading configurations:
When Unreal is running single threaded, Mercuna will only schedule jobs from the module Tick function. The budget per tick, specified in seconds, is set in the Mercuna section of Project Settings:
![]() When in single threaded mode, nav graph queries may be time sliced over multiple frames. While rebuilding the nav grid works in single threaded mode, it is not recommended as you can easily schedule more work than it is possible to perform on a single thread.
When in single threaded mode, nav graph queries may be time sliced over multiple frames. While rebuilding the nav grid works in single threaded mode, it is not recommended as you can easily schedule more work than it is possible to perform on a single thread.
By default, Mercuna schedules work using Unreal’s Worker Thread Pool directly. This can be modified in the Mercuna Project Settings:
 You can choose between scheduling work on the Unreal Thread Pool, the Unreal Task Graph, or Independent Worker Threads, which starts threads independent of Unreal’s thread pools.
If Independent Worker Threads are chosen then the Num Mercuna Work Threads option controls how many worker threads are started for Mercuna. Otherwise, this option is ignored. If Independent Worker Threads are chosen then these worker threads will be spawned and used even if Unreal is running single threaded.
When the Unreal Thread Pool or Task Graph is used for job scheduling, the maximum number of jobs Mercuna will schedule simultaneously (i.e. the maximum number of worked threads it will occupy) can be set by calling FMercunaModule::SetMaxSimultaneousTasks from code. The default maximum is one less than the number of threads in the thread pool.
Mercuna supports level streaming by saving the nav grid that is relevant to each streamed or composed level (sub-level) within that level.
When using level streaming, Mercuna Nav Grid Volumes and Mercuna Nav Seeds should be placed in the sub-level so that they are loaded and unloaded at the correct times.
When editing the Persistent level you will see one Mercuna Nav Ground Grid in each loaded sub-level, this nav grid is automatically associated with the Nav Grid Volumes and Nav Seeds that are in that sub-level.
In order to allow seamless navigation between nav grids loaded from different sub-levels, Mercuna merges together nav grids loaded from sublevels at runtime. To enable this feature, the nav grids in the sublevels must have exactly the same settings, have the same orientation, and have the Allow Nav Graph Merging option set.
Additionally, all Nav Grid Volumes must have Precise Boundaries disabled in order to allow the associated nav grids to merge. This ensures alignment of the volumes present in each nav grid, so that whole nav grid tiles can be copied during nav grid merging.
If Allow Nav Graph Merging is false, the nav grid settings don’t match, or precise boundaries are switched on, then nav grids won’t be merged and multiple nav grids will exist at runtime. In this case you can manually switch pawns between nav grids using the Set Nav Grid function on the Mercuna Ground Navigation Component.
The best way to generate the sub-level nav grids is from the Persistent level. Load all your sub-levels using the levels window and then select Build All Nav Grids from the Mercuna menu. This ensures that geometry that overlaps between levels is correctly represented in each level’s nav grid. Once generation is complete, save all the sub-levels.
If it is not possible to load all levels due to memory constraints, go through each sub-level containing a Mercuna Nav Ground Grid in turn. Load a sub-level and all levels that contain geometry overlapping or close to Nav Grid Volumes within that sub-level, generate the nav grids in that sub-level by selecting them and using the Build Selected Nav Grid option from the Mercuna menu. Then save the sub-level and go on to the next.
Mercuna supports UE5’s World Partition system in a way that is transparent to the user and is designed to be simple to use.
In contrast to Level Streaming or World Composition maps, where a Nav Grid per sublevel is required, in a World Partition map you only need a single Nav Grid and then can freely place Nav Grid Volumes that can span large regions.
Internally Mercuna automatically splits the grid data into chunks and saves each part within an invisible grid of MerNavDataChunk actors. As these chunk actors are loaded and unloaded by the World Partition system, both in the editor and at runtime, the corresponding part of the grid will be merged in on load, or purged from memory on unload.
The whole map can therefore be covered by a single Nav Grid. Nav Grids are stored as non-spatially loaded actors and will always be present, whereas the Nav Volumes/Modifier Volumes/Exclusion Volumes are stored as spatial actors that are streamed in and out by the World Partition system as required.
When the Nav Grid is built in the editor, only the part that corresponds to currently loaded editor cells will be generated. Actors immediately surrounding the loaded cells will be automatically loaded by the build process to ensure the edge of the generated volume is consistent. These actors are then unloaded once the build is complete. You must not load or unload editor cells while the build is running.
It is therefore possible to generate one part of the grid, save that section, and then load a different set of editor cells, generate the grid for that region, and then have both sections of the grid seamlessly merge together at runtime. However, we strongly recommend having an overnight job that builds the nav grid using the commandlet (see below) in order to ensure the nav grid is consistent with all changes that have been made to the map.
If the Nav Grid is placed into any data layers, then when building in the editor only actors that share at least one data layer with the Nav Grid will be included for the purposes of generating the grid.
Runtime builds and rebuilds work as normal, but note that they will only build based on the geometry that is currently loaded in the specified volume.
Nav Grids can also be built using the Mercuna World Partition Builder Commandlet. This will build all the Mercuna nav graphs by iteratively loading the cells within the specified map. The commandlet can be run from the command line using:
UnrealEditor.exe ProjectName.uproject MapName -run=WorldPartitionBuilderCommandlet -Builder=MercunaWorldPartitionBuilder [-BuilderCellSize=102400]
The builder uses a two stage process, first building up the nav grid in sections, and then using a post process step to apply nav seeds to the entire grid. This means there are no restrictions on where you place seeds and no requirement on how many nav seeds are needed.
The parameter BuilderCellSize can be used to adjust the size of the portion of the map loaded in each iteration of the build process up to a maximum of 819200 for larger scale maps.
If the -IgnoreUnchangedChunks flag is added to the WP commandlet builder then a rebuild is performed instead of a full build. This means that for regions of the world where nothing has changed the nav grid is not regenerated, speeding up the build.
While this mode is designed to detect all relevant changes that would affect navigation, it is incremental and as with any incremental build system, it is possible that some inconsistencies may arise. For this reason, we recommend periodically running the commandlet without the -IgnoreUnchangedChunks flag to ensure correctness.
If Apply Nav Seeds is enabled on the Nav Grid, then Remove Unseeded must be disabled for the -IgnoreUnchangedChunks flag to take effect. If both Apply Nav Seeds and Remove Unseeded are enabled, the flag is ignored and a full build is performed instead. This is necessary because parts of the nav grid may become seeded or unseeded due to connectivity changes in other chunks, which can only be correctly resolved with a full build.
At runtime, as the world partition system loads and unloads actors as they come into range, the MerNavDataChunk actors will be correspondingly loaded/unloaded and merged/purged from their parent nav grid.
The merging and purging is done asynchronously so as not to cause spikes on the main thread. A consequence of this is that move commands to agents in the region may fail if executed too quickly as the nav grid data may not have yet been merged. This can most frequently occur if moves are executed on map BeginPlay. It can be resolved by adding a short delay before the move.
When a nav grid is loaded and ready for use the OnLoadComplete event on the Nav Grid triggers. In simple configurations where nav grids aren’t loaded from multiple sub-levels simultaneously and there is no level streaming, this event is triggered immediately after the nav grid is loaded. However, if the nav grid is merged with another nav grid when the level is loaded, then OnLoadComplete is not triggered until the merge is complete. Once the event fires, you know that pawns are able to navigate across the merged part of the nav grid.
It can sometimes be desirable to build the Nav Grid at runtime, particularly for procedurally generated levels. Since these grids will be generated at runtime it is recommended that they should have the Never Save property set on them. This prevents any data that might be generated in the Editor while testing from being unnecessarily saved.
The build can be triggered by making a request on the nav grid actor (via Blueprint or C++) using the Build function. Once nav grid generation has fully completed, the event OnBuildComplete is triggered.
As an alternative to using Build to generate the whole of the nav grid, you can instead choose to generate only sections of the grid at runtime.
To do this, set Never Save on the nav grid as normal and then use the Rebuild Volumes function to build the grid in sections. If you want to generate the grid in volumes that may have already been partially generated, but the geometry within those volumes has not changed, set Only Unbuilt on the call to Rebuild Volumes.
You can spawn nav grids at runtime in the usual way. The basic properties of the nav grid, such as cell size and agent type, must be set at spawn time. If you spawn through Blueprint then these properties can be set on the spawn actor function. If you spawn in code then you must use deferred spawning to set these properties before finishing the spawn.
You must then associate Nav Grid Volumes with the nav grid before building the nav grid using either Build, Rebuild Volumes or Nav Invokers. Use Add To Nav Grid on the Nav Volume to associate it with the nav grid at runtime. If this is done before the nav grid is built, then you don’t need to call Rebuild Changes.
Specific volumes of the Nav Grid can also be rebuilt while the game is running using the Rebuild Volume or Rebuild Volumes functions on the Nav Grid actor. Rebuild Volume is normally used to pick up runtime changes when just a section of the level changes, such as a door opening.
Once the volume has been rebuilt, the event OnRebuildComplete is triggered. This event includes the volume that was regenerated, to aid with scripting.
Pathfinds and reachability tests that go through the regenerated region may fail while the regeneration is in progress. Once regeneration is complete, all active paths are recomputed if they go through or close to the regenerated region, causing actors to path around new obstacles or through newly available shortcuts. If a pathfind fails during regeneration, you may want to retry it once the OnRebuildComplete event has been triggered.
Regenerating a region only builds nav grid data within that region. This means that regions that are newly connected to a nav seed through the regenerated region will only become navigable if unseeded parts of the nav graph have been kept.
Normally, if nav seeds are in use and a runtime regeneration might connect a volume that is not connected to any other nav seed when the nav grid is built in the Editor, you must place a seed within that volume.
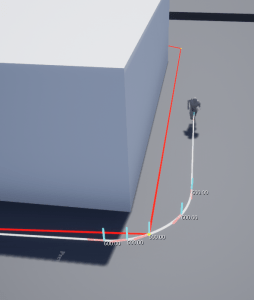
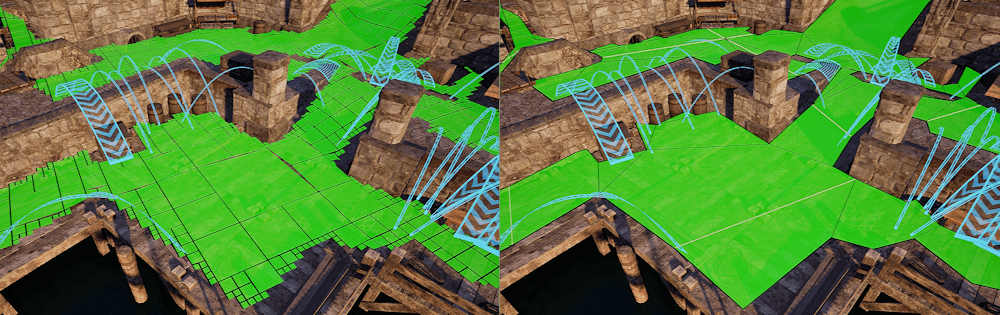
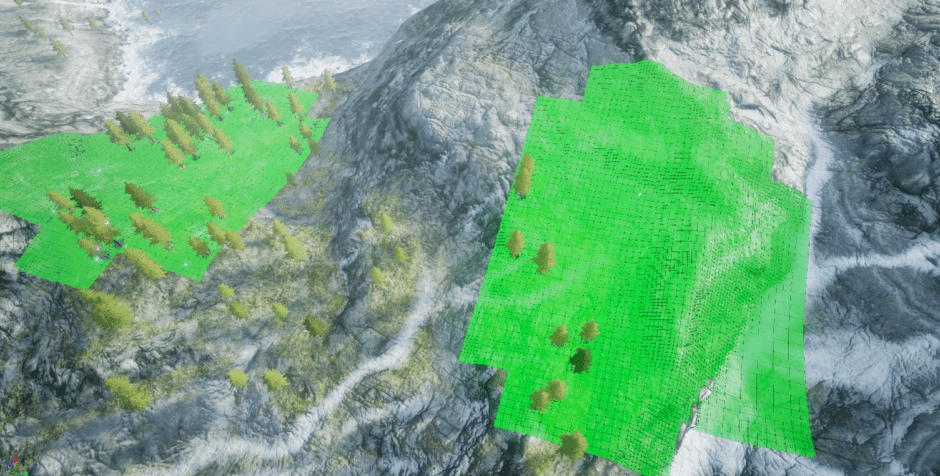
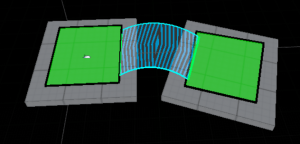
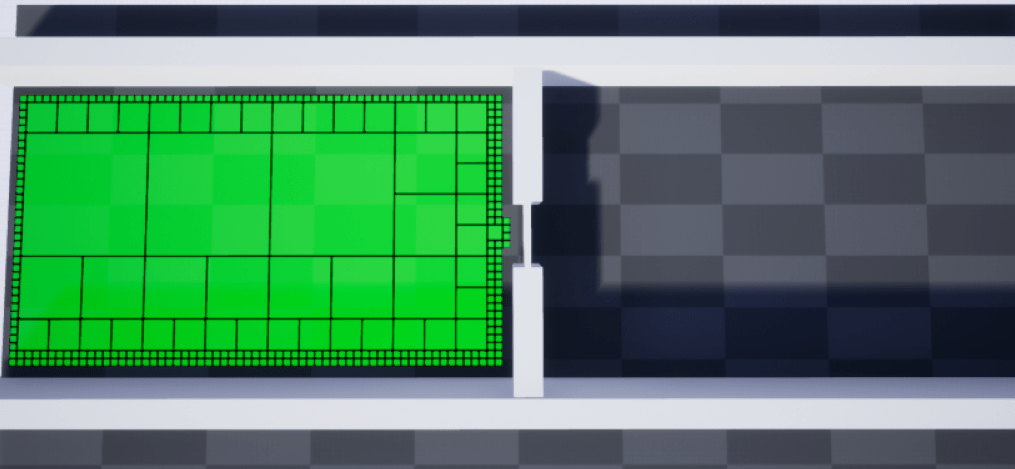 In the screenshot above, the green region on the left is navigable and seeded. The wall in the centre has a door in it, and when this opens Rebuild Volume is triggered through blueprint to regenerate the navigation data around the door.
However, navigation into the region on the right will still not be possible because that region was not seeded. This can be fixed by adding a Mercuna Nav Seed into the right hand region.
Alternatively, if you do not want IsNavigable checks to succeed in disconnected regions, or if geometry might be destroyed in arbitrary locations so that you aren’t sure what disconnected areas of the world might need seeding, you can disable removal of unseeded parts of the nav graph. This means that the unseeded portions will be kept and they will become navigable when connected by a rebuild, providing that the Apply Nav Seeds option is used when rebuilding the volume. To do this, switch off Remove Unseeded on the nav grid.
If nav seeds are in use and Apply Nav Seeds is set on the call to Rebuild Volume(s), unseeded nav mesh will be removed or disabled in the volume that has been rebuilt. If you don’t need the unseeded portion of the nav grid in the rebuilt region to be removed , or newly seeded regions to be connected, you may want to disable Apply Nav Seeds in order to slightly reduce the time that Rebuild Volume(s) takes.
Note that if you are relying on unseeded parts of the nav grid being present in order that they become navigable when connected, the Remove Unseeded Nav Graph Data on Cook project setting must be disabled.
Nav Grid Volumes, as well as Exclusion Volumes, can be spawned, moved or deleted after the nav grid has been built. The nav grid is not changed immediately, instead Rebuild Changes must be called to trigger a rebuild. Nav Grid Volumes must have the same orientation as the nav grid.
If using nav grid merging through level streaming or world composition, Nav Grid Volumes must not be spawned, moved or deleted. Exclusion Volumes may be spawned, moved or deleted as normal.
Nav Grid Modifier Volumes can be spawned, moved, updated and deleted at runtime. The nav grid will automatically rebuild to reflect the changes.
Physical Materials are used by Mercuna to determine the surface friction available for vehicles, as well as being one way of specifying regions of higher path cost (using a Mercuna Physical Material).
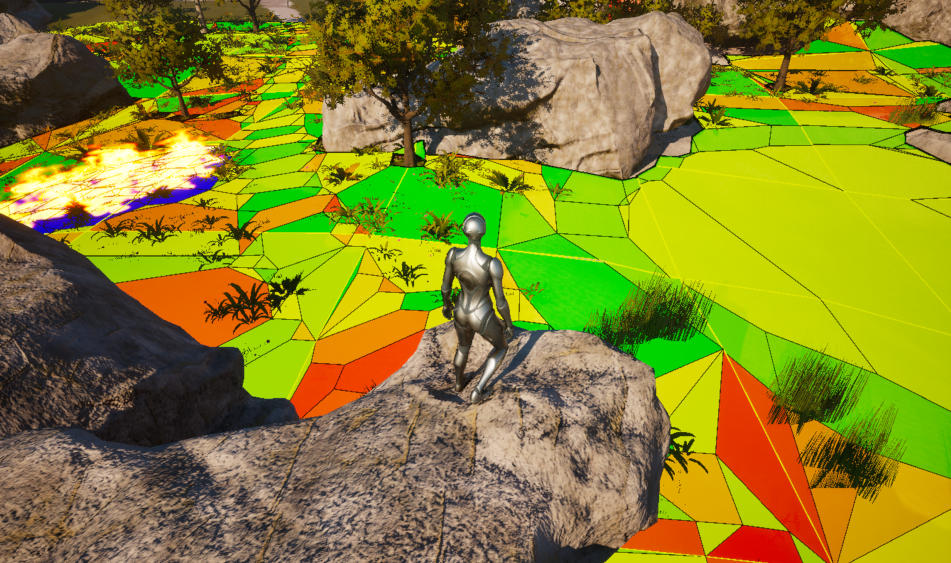
Therefore, it is important to check that the nav grid is picking up your physical materials correctly. You can do this with the Cells – Surface Type nav grid debug draw mode.
 If meshes with different physical materials are overlapping, then the nav grid might pick the wrong one up during the build. To override which material is picked up, you can specify which physical materials have priority on the Mercuna Nav Grid actor.
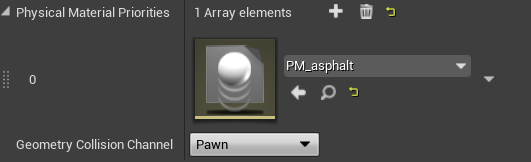
Any physical materials listed here will have priority in the order they are specified in the array, and all other physical materials will be given lower priority.
Mercuna allows the navigation cost to be modified on surfaces, discouraging pawns from moving over them. This is done by applying a custom Physical Material to the mesh.
To create a Physical Material with a navigation cost multiplier, create a new Physical Material blueprint and specify MercunaPhysicalMaterial as the class.
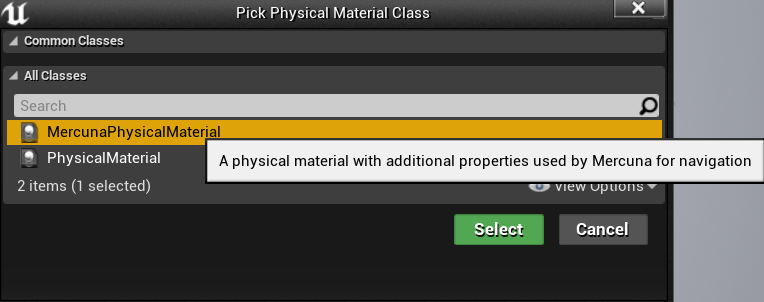
The Mercuna Physical Material has an additional property, Cost Multiplier.
 Mercuna will treat paths over any surfaces using this material as if they were Cost Multiplier times longer than their path length. This means if the multiplier is set above 1.0x then Mercuna will prefer paths that avoid traversing this material.
Due to the nature of the A* algorithm used for pathfinding, costs can only be increased and not decreased below 1.0x. Using a very high cost multiplier will mean that the pathfinder will search a long way for alternatives, and thus can considerably increase the computational cost of the path find. For this reason, the maximum cost multiplier is limited to 15.
Mercuna picks up physical materials from landscapes if they are set up, but the Unreal Engine configuration can be confusing. If you are seeing unexpected behaviour then these notes may help:
Mercuna supports Unreal’s Water plugin, allowing automatic mark-up of areas with WaterBody actors (such as WaterBodyLake, WaterBodyRiver and WaterBodyOcean).
To use this functionality, you need to enable the optional MercunaWater plugin. This can be done through the Unreal plugin browser. By providing water support as a separate plugin, Mercuna allows projects not requiring water features to be built without introducing a dependency on the Unreal Water plugin.
Water support can be enabled on a per nav grid basis by setting the Water Enabled property on your Mercuna Nav Ground Grid actor. Water is automatically identified during the geometry collection stage when building the nav grid.
Water is classified (with a usage flag) as either Shallow water or Deep water (typically too deep for wading), dependent upon the thresholds set in your agent configuration. You can then configure whether agents are allowed in shallow and/or deep water or whether they must avoid it.
The following Agent Type settings control how water is classified:
Both shallow water and deep water normally have a higher default cost multiplier to discourage paths through water. Overriding how a particular agent interacts with water, either in terms of whether it can enter water or not, or the cost of traversing water, can be done using a query filter.
Mercuna also provides blueprint functions for querying water within a given path length:
Mercuna supports pawns navigating on moving objects, such as platforms or sailing ships, by having a dedicated nav grid actor attached to the object and performing navigation within the grid’s local frame.
The recommended setup is to have a global nav grid that pawns use for navigating the stationary parts of the level. This should be set up as normal, usually with a single nav volume encompassing the entire level.
Each moving object should then have attached to it:
When the nav grid attached to the moving object is built or rebuilt, only geometry attached to the same parent object is considered.
Intergrid Nav Links can be used to connect the moving and stationary nav grids and allow seamless navigation between them via paths that span multiple grids (see the nav link section for more information).
For procedural maps, or very large open worlds, it is sometimes not possible or desirable to generate the entire navgrid at editor or even at initial load time. Mercuna therefore offers a nav invoker system that generates and maintains patches of navgrid in a local area around specified actors. As these actors move through the world new navgrid is generated in front of them, and no longer needed navgrid removed from behind them.
The advantages of using nav invokers is for very large worlds not having to store the entire navgrid in memory, and for procedural levels not having to wait at game start for the entire grid to generate. However the biggest disadvantage is the extra CPU usage as navgrid is constantly being generated and removed as invokers move around.
One other major constraint is that agents can only move to destinations within the area of the generated nav grid. Requesting an agent to move to a destination outside this area will fail unless a partial path is requested.
When generating the nav grid for a nav invoker, the Precise Boundaries setting of nav volumes is ignored, so any generation box overlapping a nav volume will be generated if it is in range of a nav invoker.
Usually it will be AI/NPCs that are registered as nav invokers, though it is possible to register any actor as one. For each invoker you will need to specify the Generation Radius and the Removal Radius. The Generation Radius is the distance within navgrid must always exist, while the Removal Radius is the distance with which nav grid can exist. Any nav grid beyond the latter distance from an invoker will be culled. However, for performance reasons these distances are approximated and not strictly obeyed. The Removal Radius must always be greater or equal to the Generation Radius. In cases where there exist multiple nav invokers of the same agent type within the world, navgrid is shared between them.
An actor can be registered as a nav invoker in two different ways.
In both cases, the Generation Radius and Removal Radius must be manually specified.
On registering the first invoker with a navgrid, if there are any existing areas of generated grid (that had been previously created via a runtime Build/Rebuild call) they will be cleared.
When doing runtime rebuilding of an area of the nav grid while using nav invokers, only parts of the grid within the specified volume that are within range of a nav invoker will be rebuilt. Also, only nav grid of the same agent type as the nav invoker will be rebuilt.
Invoker volumes denote areas in the world that either should always be generated or should be generated in their entirety if any part of the volume is overlapped by a nav invoker. This can be particularly useful in geometry rich parts of the world, where a path to reach a nearby point may require the agent to take a detour outside of the currently navigable area.
An invoker volume can be created by adding a Mercuna Nav Invoker Volume actor to the level. Each invoker volume belongs to a nav grid and must have the same orientation as associated nav grid actors.
The invoker volume Type property can either be Always (default) or OnOverlap. A volume set to Always means that nav grid will always be present through the volume, regardless of whether any invokers are in or near it. Nav grid for OnOverlap volumes is only generated when the volume is overlapped by an invoker.
The nav grid for Always nav invoker volumes can be generated by an editor build. Just these volumes will be generated and then saved as part of the level. Building the grid for these volumes at editor time saves having to generate the grid at game start up time. For building Always volumes in the editor, Use Nav Seeds must be disabled on the nav grid.
The structure of the nav grid’s polymesh within a specified volume can be queried through a C++ call. The query returns a copy of the poly mesh structure, including the polygon vertices, polygon properties, connections between polygons and nav link connections.
It is important to note that the returned polygons represent a copy of the state of the polymesh at the time of the query. The polygons of the nav grid may change if modifications are made by stationary obstacles, modifiers, or if the polymesh is rebuilt.
Mercuna Ground Navigation supports two types of pathfinding:
In both cases, after the graph search, the resulting path is aggressively straightened using raycasts through the quadtree to eliminate artifacts commonly introduced by navigating through discrete graph nodes. A smooth, curved path composed of parabolic segments is then fitted to the straightened result, allowing agents to move naturally and fluidly through the environment.
Mercuna can also support partial paths. A partial path is returned when a complete path can’t be found to the specified destination, for example if it is disconnected from the start point. Instead Mercuna returns a path to the closest point to the destination that is reachable. Partial path functionality is optional on pathfinding and movement requests, and by default partial paths are not used.
Finding paths through the Mercuna Ground Nav Grid can be done implicitly by making your pawn movement controlled by Mercuna. This method allows you to take advantage of the Mercuna steering system. Alternatively, you can query for paths directly using methods on the Mercuna Nav Ground Grid actor, or explore the pathfinding results using Mercuna Nav Grid Testing actors.
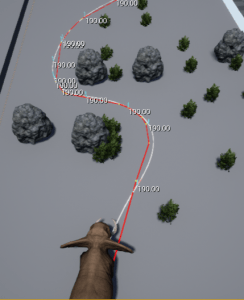
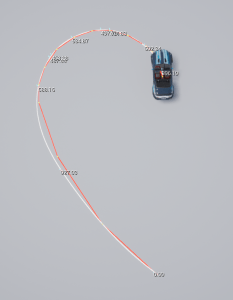
In order to easily debug and understand pathfinding problems a pair of Mercuna Nav Grid Testing Actors can be used to generate test paths. Simply drag two testing actors into the level, and on one of the actors set the other one as the Other Actor, and set the agent type.
When you do this a test path will be drawn connecting the two actors. This path will update when either actor is moved. A white path means a complete path could be found, while an orange path means that only a partial path could be generated.
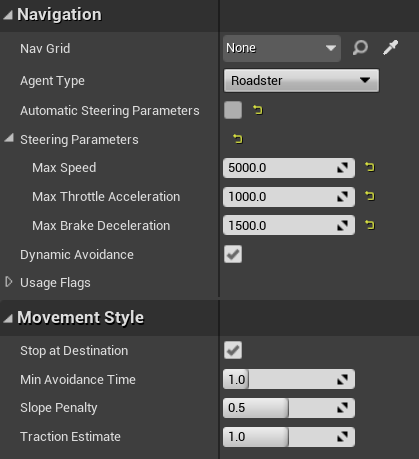
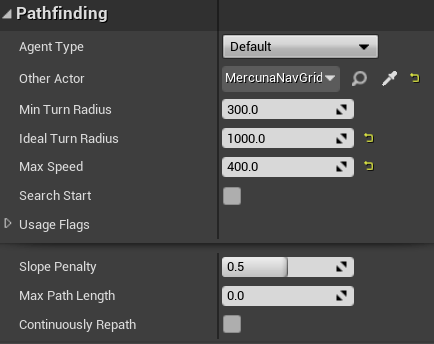 The Min Turn Radius property sets the radius of the smallest turning circle, and the Ideal Turning Radius sets the turning circle it ideally tries to turn at if space is available. The Max Speed allows for some basic speed integration.
Slope Penalty (0-1) indicates how much the agent disfavours slopes (note that this is relative to the maximum slope for the agent type). Max Path Length allows you to control how far the pathfinder will search.

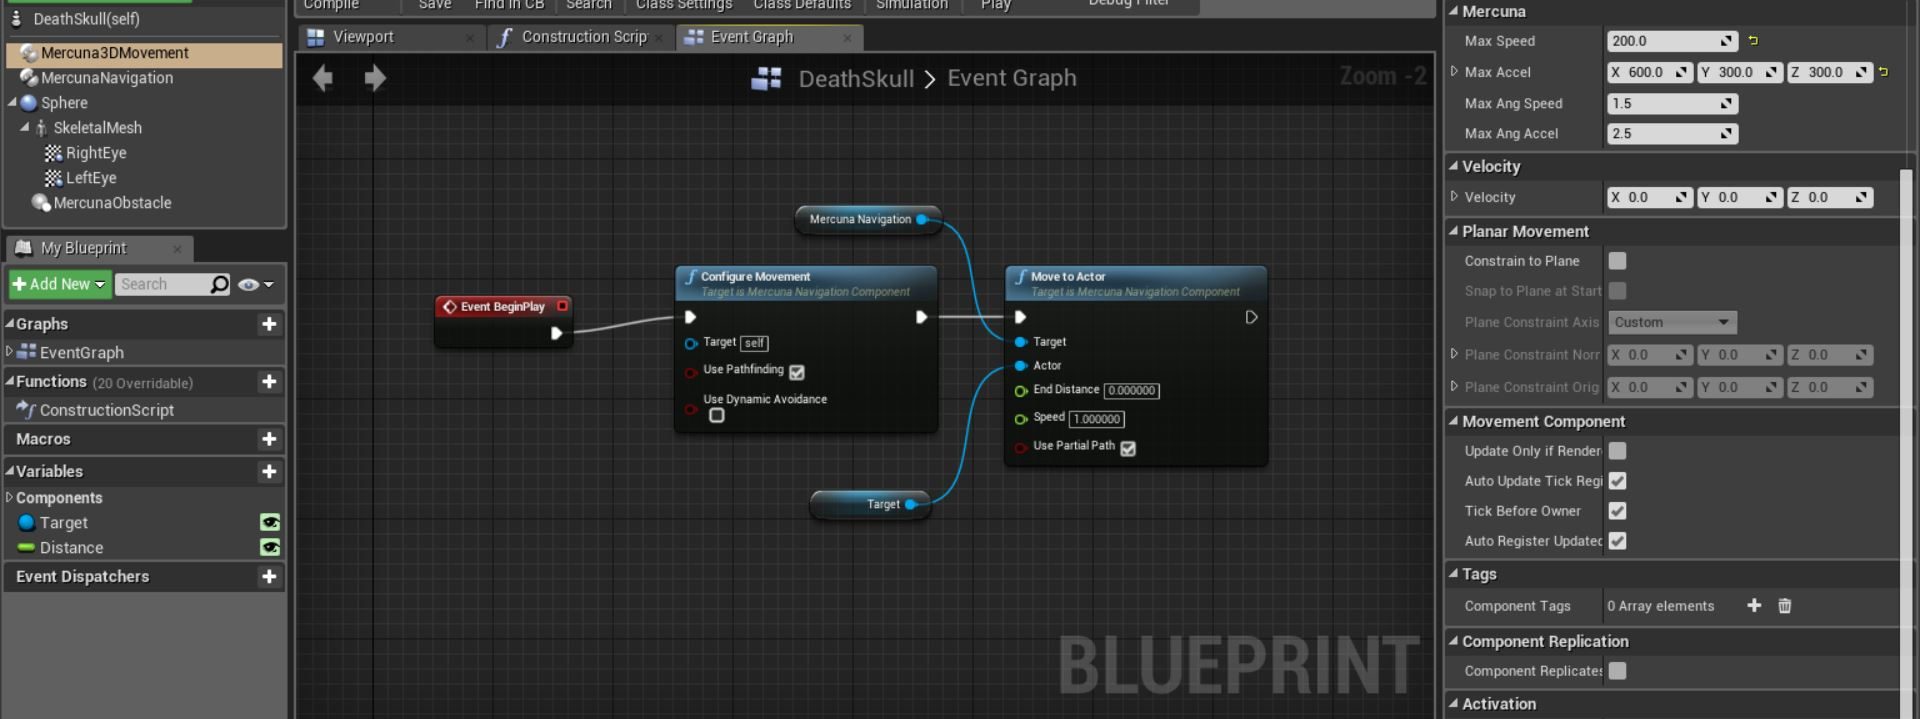
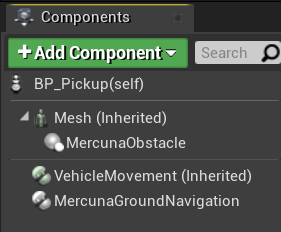
In order to allow pawns to use Mercuna to navigate they need to have the following components:
The navigation component offers both a C++ and Blueprint interface for making movement requests to the pawn.
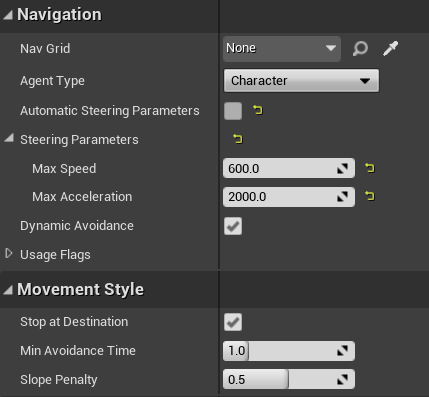
Mercuna will try to automatically find a Mercuna Nav Grid that is compatible with the Agent Type set on the Ground navigation component, and automatically fill in steering parameters based on the setup of the pawn. Alternatively, these can be explicitly overridden here.
For the purposes of navigation the size and shape of the agent will be taken from the Agent Type. When the navigation component is selected the agent’s navigation shape will be drawn in the viewport so that you can check that it is a good fit for the agent.
Example ground navigation components where steering parameters have been explicitly set
For wheeled vehicles, check these settings in your agent type configuration:
If you are manually setting the steering parameters that control how Mercuna expects the vehicle to behave, then
Specific to Vehicles, in the Movement Style there is the Traction Estimate, increasing this above 1 causes the vehicle to overestimate the available traction and make higher speed turns at the risk of sliding. Reducing the value has the opposite effect of underestimating the traction resulting in more cautious driving.
The reverse speed will be picked up automatically for Chaos vehicles, and for a NavGridTestingActor the maximum speed in reverse will default to ¼ of the MaxSpeed.
Mercuna ground navigation can be used to steer an agent that has a CharacterMovementComponent.
It is recommended to use velocity-based (rather than acceleration-based) path following (this is due to the UE character movement component rotating the character based on the acceleration vector input). To configure velocity-based path following make sure that Use Acceleration for Paths is disabled on the CharacterMovement component.
Either set Orient Rotation to Movement True, or to get smoother rotation set:
Use Controller Rotation Yaw False on the Character, and set Use Controller Desired Rotation True and Orient Rotation To Movement False on the CharacterMovement Component.
If you are manually setting the steering parameters that control how Mercuna expects the animal to behave, then
Settings should be similar to a slowly turning animal. By setting the agent category to Character the pathfinder will allow paths with sharp corners, taking advantage of the characters ability to change direction quickly.
A subset of the steering parameters can be updated even whilst the agent is moving, for example to make a character follow a path more or less aggressively, via the UpdateDynamicSteeringParams function from C++ or Blueprint. These parameters can be updated frequently but should not be changed every frame. These changes will persist even after the move has completed.
To change only the maximum speed for the duration of the current move, the OverrideSpeedMultiplier function can be used.
Mercuna uses movement adapters to connect the navigation component with different movement systems – such as the CharacterMovementComponent or MoverComponent. These adapters act as a bridge between Mercuna’s path following and the agent’s underlying movement logic.
Each tick, the Mercuna navigation component calculates how the agent should move in order to follow its path. This is done via its internal driver, which produces a movement output with desired velocity, acceleration, turning rate, etc. The active movement adapter is responsible for translating the output into appropriate commands/input for the target movement system.
If an agent’s steering parameters are set to automatic, the movement adapter is also responsible for populating the current steering parameter values.
A movement adapter can be explicitly assigned on the navigation component. If left blank, Mercuna will automatically attempt to select a suitable adapter for standard movement components.
Currently available adapters:
If you’re using a custom or non-standard movement system, you will need to implement your own movement adapter.
Mercuna normally handles path following automatically, moving the agent along the computed path. However, you can take full control over movement while still using Mercuna for pathfinding.
To use manual path following, set the Manual Movement Adapter on the agent’s navigation component. In this mode, Mercuna no longer generates movement output; instead, it expects you to drive the agent’s movement using its path directly. As the agent moves, the path is trimmed and will automatically repath as needed – either if the agent comes off the path or on a nav mesh rebuild.
If you want to use automatic steering parameters in this mode, you must create a subclass of the Manual Movement Adapter and override PopulateAutomaticSteeringParams. Even with manual control, Mercuna still needs valid steering parameters for path construction and dynamic avoidance.
For manual path following you still make a move request to the navigation component as usual. This can be done by calling MoveToLocation/Actor on the component, or by using the provided BT nodes, Tasks, etc.
Once a request is made, call GetCurrentPath on the navigation component to obtain a UMercunaSmoothPath. You must wait until the path is ready before using it.
UMercunaSmoothPath provides multiple methods for retrieving positions and tangents along the path:
When the movement request is completed or cancelled, the path will be invalidated and can no longer be used.
If you require dynamic obstacle avoidance during manual path following, you can call CalculateAvoidance on the navigation component with a desired velocity. This will, if required, return an adjusted velocity that avoids collisions with nearby dynamic obstacles.
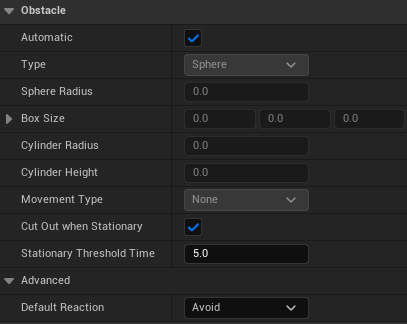
Any actor can be made a dynamic obstacle by adding a Mercuna Obstacle component. It is expected that Mercuna navigated pawns will usually have one, but other pawns such as the player, might also have an obstacle component so that the AIs avoid them.
Obstacles components should only be used for actors that are expected to move relatively frequently, such as pawns. For actors that are normally static, it is preferable to build them into the nav grid and use Rebuild Volume to update the nav grid if their position changes. This will improve runtime memory usage and performance.
By default Mercuna will automatically try to calculate the best shape of obstacle that encloses the pawn. For pawns with a Mercuna Ground Navigation component this will be set based on the agent type. Alternatively, the shape and size can be manually set. The available shapes are Sphere, Box, Cylinder. The shape only applies for avoidance.
The Movement Type configuration specifies how avoidance should treat the agent. Characters will prefer to deviate from their path in order to avoid other agents, whereas Vehicles will prefer to adjust their speed but stay on their path. Additionally, characters will adjust their paths assuming that vehicles will not avoid them.
Actors with an Obstacle component should have “Can Ever Affect Navigation” switched off on their Collision settings on all their components so they aren’t baked into the nav grid.
The Cut Out When Stationary and Stationary Threshold Time options configure whether the obstacle is cut out of the Nav Grid when it is stopped, if this option is enabled on the Nav Grid. See Stationary Obstacles for more detail.
The Default Reaction parameter specifies whether other navigating agents will normally avoid this agent. For more fine grained control, avoidance of a particular obstacle by a particular agent can be configured using the SetAvoidanceAgainst call from C++ or Blueprint.
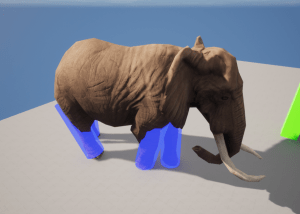
It can sometimes be desirable to use multiple obstacle shapes to describe an actor, rather than just using a single large obstacle shape. An example of this might be a large animal that wants to allow smaller animals to run between its legs. In this situation you can add multiple obstacle components and attach one to each leg using a socket.
Nav Grid Modifier Volumes provide a mechanism for designers to influence and limit navigation within specific regions. For example:
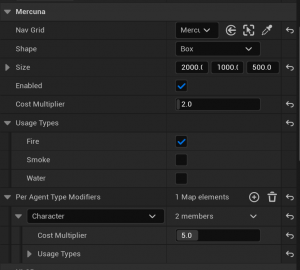
In the project settings you can define up to 32 custom global usage types. These can then be assigned to individual Modifier Volumes to mark what the volume represents. Flags corresponding to each usage type can be set on the Ground Navigation Component of pawns to indicate which types of volumes it is allowed to enter, or that it is required to stay within.
For example, if you define a Fire usage type, you can mark Modifier Volumes as representing a region that is on Fire. By default pawns will not be allowed to enter that region, but they can be configured to enter and move through Fire regions as normal, or alternatively can be restricted to only move inside of Fire regions (e.g. a fire demon).
During a path search through the Nav Grid, Modifier Volumes allow designers to increase the cost of specific volumes and therefore discourage pawns from moving through them.
When a volume has a modified cost multiplier, the path distance is multiplied by the cost multiplier to calculate the expense of traversing a volume. The size of the additional cost of passing through a volume determines how far pathfinding will search for longer alternative routes that avoids it, before deciding to use it as part of the path.
Due to the nature of the A* algorithm used for pathfinding, costs can only be increased and not decreased below 1.0x. Using a very high cost multiplier on a volume will mean that the pathfinder will search a long way for alternatives, and thus can considerably increase the computational cost of the path find. For this reason, the maximum cost multiplier that can be set on a volume is limited to 15.0x.
If multiple modifier volumes overlap, the maximum cost multiplier across the overlapping volumes is used.
It is possible to override both usage flags and costs on a per agent type basis. This can be done by adding an entry for the given agent type to the PerAgentTypeModifiers map on the modifier volume. Both usage flags and costs will be overridden for that agent, so both must be set. Any agent types without an override set will use the modifier volume’s base values.
The modifier volume shape can be set as an oriented Box, Cylinder, Sphere or Prism. A Prism is a 2D shape with constant height. The points of the shape can be clicked on and moved. Right-clicking on a point brings up a context menu allowing you to add a new point at the same position or delete the existing one.
Usage types are defined in the Mercuna page of the project settings. Up to 32 usage types may be defined.
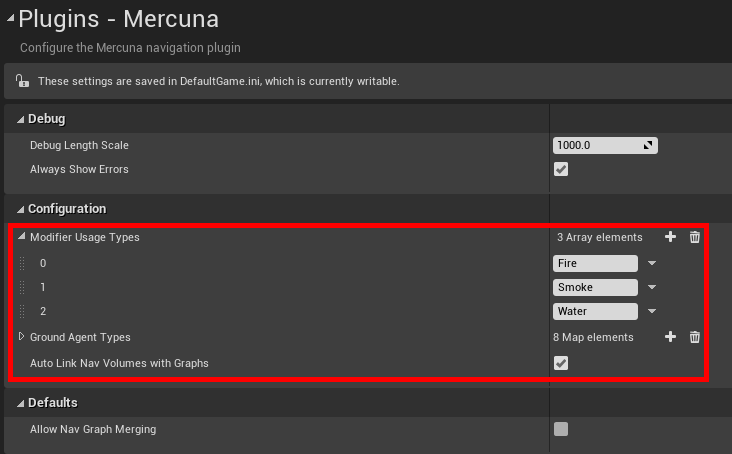 Warning: removing usage types does not update the usage flags configured on existing modifier volumes or navigation components. Removing the Smoke usage type in the above example means that all the usage flags on actors that previously corresponded to Smoke will now be applied to the Water usage type instead.
To create a modifier volume, add a Mercuna Nav Grid Modifier Volume actor into the level, size and rotate it appropriately. Alternatively, you can add a Mercuna Nav Grid Modifier Component to any actor.
In the Mercuna section of the modifier volumes property panel, the cost and usage types for this volume can be configured.
Whenever a volume is created, moved or resized in the Editor the nav grid must be rebuilt for the change to be applied.
By default, when created in the editor, Nav Grid Modifier Volumes are applied to all nav grids. To restrict them to particular grids, you can either assign them to only apply to a specific grid or use a gameplay tag query to limit them to only grids with tags that satisfy the query.
At runtime, spawned Nav Grid Modifier Volumes are not applied to any grid. You must call either AddToGrid or AddToAllGrids (with an optional tag query) before they are applied.
Costs are automatically taken into account during pathfinding and spatial searches, but by default agents will not enter modifier volumes that have any usage types set. To allow or require pathfinding through volumes of particular types, the corresponding usage flags can be set on the Mercuna Ground Navigation Component.
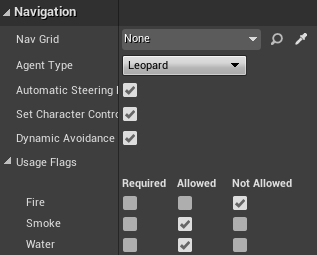 The default for each flag is Not Allowed. Required means the agent can only move in volumes and through nav links with that usage type set. If multiple usage types are set as Required then the agent can navigate within any modifiers that have at least one of those usage types. Allowed means the agent may, but does not have to, enter volumes and nav links with that usage type.
At runtime, the settings on Modifier Volumes can be updated using the SetEnabled, SetUsageFlags and SetCostMultiplier functions on the Modifier Volume actor. These functions are exposed to blueprint.
Any paths through the changed modifier volume will be updated to reflect the change.
Changing these settings is relatively inexpensive, compared with the cost of a full grid rebuild for the modified volume.
Modifier volumes may be added, removed or moved at runtime, however this requires updating the nav grid in the modified volume (the update is triggered automatically), so should not be done too frequently.
To add a modifier volume, spawn a Nav Grid Modifier Volume actor, set the usage types and cost multiplier, and then use the AddToGrid or AddToAllGrids function to add the modifier volume to the nav grid.
To remove a modifier volume, simply destroy the actor, or call RemoveFromGrid.
Modifier Volumes can be moved, rotated and resized by changing their transform in the normal way.
A maximum of 24 modifier volumes can be present in each 64×64 cell tile of the nav grid. There is also a limit of 254 distinct overlapping combinations of modifier volumes within a tile.
The Mercuna Nav Modifier Volume actor will be removed in a future version. You should use the new Mercuna Nav Grid Modifier Volume actor instead.
To facilitate the transition a console command has been added that allows you to automatically replace all MercunaNavModifierVolume actors in a map with instances of the new MercunaNavGridModifierVolume actor with the same properties. The migration can be run in the editor using the console command “mer.MigrateNavModifierVolumes”.
Only MercunaNavModifierVolume actors that are loaded and assigned to a nav grid will be migrated. Modifier volumes contained in level instances will require the instance to either be editable, or opened as its own level. It is recommended to run the command on the persistent level first as editing level instances will delete undo history.
You may see warnings about nav volumes that have no nav graph assigned. The tool cannot determine whether these modifier volumes should be migrated to Octree or Grid modifier volumes, so does not change them. They should either be assigned to a navgraph before running the tool, or they should be migrated manually. If no such modifier volumes should exist, adding the argument TRUE to the console command will instead forcefully delete any modifier volumes with no nav graph assigned.
Modifier volumes of classes that derive from the old Mercuna Nav Modifier Volume actor can not be automatically migrated and will need to be manually migrated instead.
Note: The command will also affect modifier volumes assigned to nav octrees, converting them to Mercuna Nav Octee Modifier Volumes.
Mercuna Navigation Query Filters provide fine-grained control over pathfinding by determining the navigability and cost multiplier of polygons on a per-query basis. They are a powerful tool that enables you to override an agent’s configured usage flags for specific queries. For example, an agent that normally is excluded from water can use a filter to temporarily allow traversal through water or even prioritize it as a preferred route.
Agents can be assigned a default query filter via their Ground Navigation Component, which will be applied to all their paths. The filter can be changed at runtime, but will trigger a reconfiguration of the agent and cancel any current path command. Additionally, filters can be passed directly into query functions available on NavGrid actors.
Query filters must be implemented in C++ and are required to be high-performance and thread-safe. They are invoked frequently on background threads during pathfinding operations. Mercuna retains a shared pointer to the filter for the duration of the query.
During a pathfinding or reachability query, the filter is called for each polygon encountered to assess its navigability, cost multiplier, and friction. The filter must decide based on the provided polygon properties, such as its usage types, surface type, and approximate normal. The filter must be consistent. That is, it must provide the same output when given the same inputs during a query.
In addition to evaluating polygons, query filters can also control nav link usability. When a search encounters a nav link, the filter is invoked to determine whether the link is traversable and can adjust its associated cost.
Filters can derive from either:
MercunaNavigation2DQueryFilterExamples.h provides a collection of simple query filters as examples.
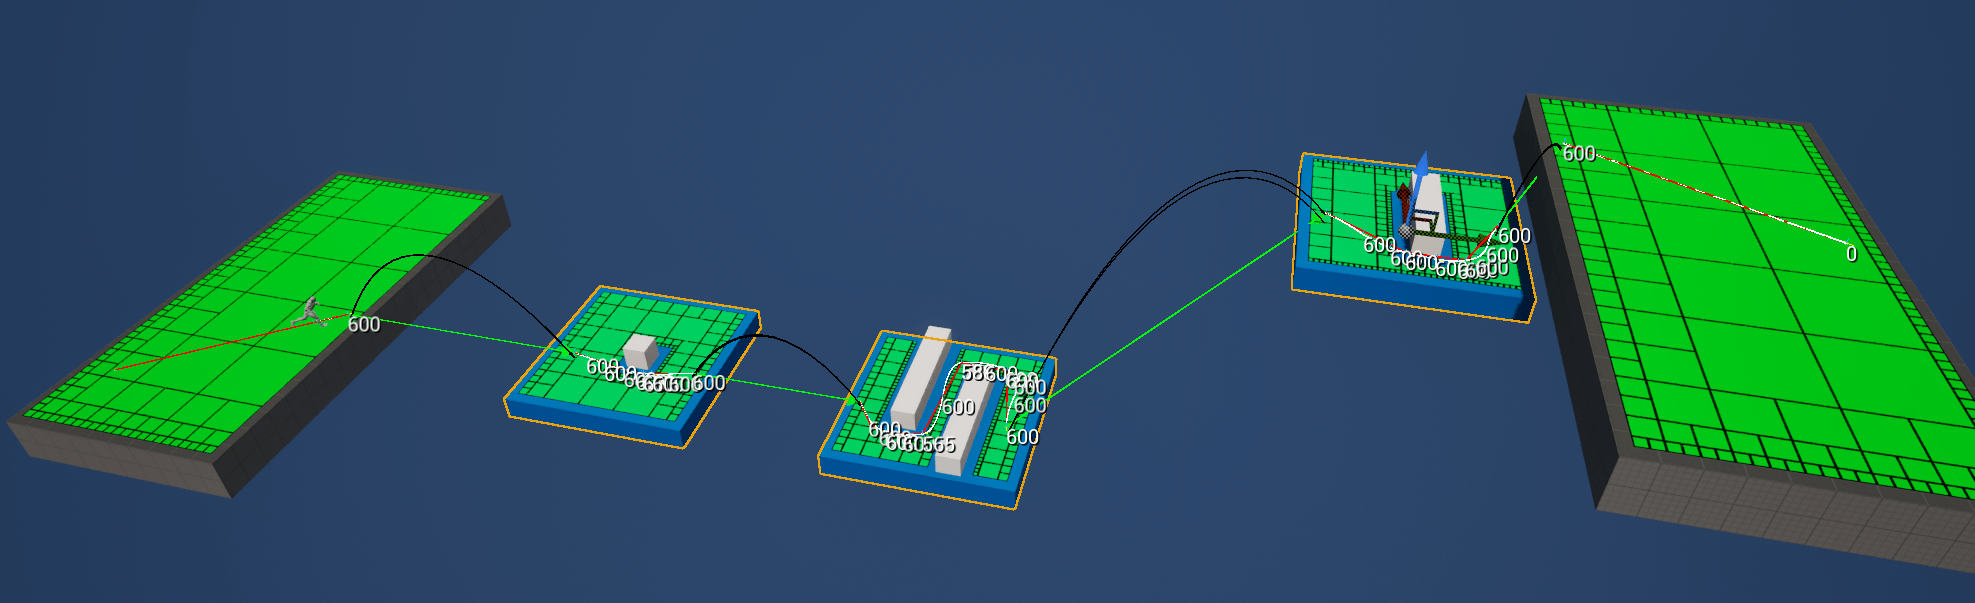
Sometimes you will want agents to navigate in non-standard ways, for example climbing a ladder or making a jump. Mercuna Ground Navigation supports this through Nav Links.
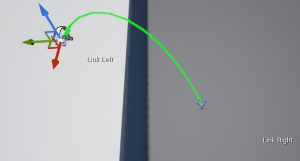
A Nav Link has two ends, labelled Left and Right, and a connection is inserted into the navigation graph between the two ends when the nav grid is built. You can choose for the link to be navigable in one or both directions.
Mercuna supports both automatic generated and manually placed Nav Links. Automatic links cover basic jumps between navigable geometry, based on kinematic constraints configured for a particular agent type.
Manual links are placed by you and can cover non-standard navigation more generally. Your blueprint or game code is responsible for actually traversing a manual link, whether by teleportation, playing an animation or any other method desired. Once the agent reaches the end of the link, Mercuna takes control again and continues the navigation.
Mercuna can automatically find and place nav links for jumps when building the nav grid. Automatic jump link generation can be enabled by toggling ‘Generate Jump Links’ in the Generation options on a Mercuna Nav Ground Grid actor.
Once enabled, jump links are generated automatically the next time the grid is built.
Automatic Jump Links are created as rails between two polymesh edges, or a polymesh edge and a navigable surface. These links can be either bi-directional or one-way, depending on the height difference between the start and end, as indicated by the presence of arrows on either side of the link, with a green start-bar for the side(s) that can be entered.
Automatic jump links can be prevented from being generated in a region by using an Exclusion Volume with the ExclusionType set to AutoLinks (or Both).
Automatic Jump Links can either be from an edge to another edge, in which case their maximum angle is defined by the user configured Max Perpendicular Angle, or from an edge to a lower surface, in which case they are projected perpendicular to the original edge.

Display of the links can be controlled via the Draw Auto Jump Links option on the Mercuna Nav Ground Grid actor, and the colour can be edited in Editor Preferences > Plugins > Mercuna > Auto Jump Link Color.
Automatic Jump Links are created in both editor builds and runtime builds and rebuilds. Note that generating jump links will increase build times, especially for rebuilds of small volumes, because an additional volume around the rebuilt volume must be analyzed in order to check for jumps.
Automatic jump link generation is not supported when using nav invokers.
Parameters controlling the Automatic Jump Links are configured on a per agent type basis and can be found in the Agent Type Settings. Parameters relevant to Automatic Jump Links are:
The agent’s size is considered by Automatic Nav Link generation and links are only generated where there is sufficient space for the agent to clear any obstacles. Links are also disallowed if they fall below minimum length, or connect edges which are trivial to navigate without jumping.
By default, Mercuna will ignore small obstacles such as curbs or bumps near the start of a jump. This allows jumps to be generated at shallower angles than would have otherwise been possible.
If you run into issues with obstacles near the start of a jump, this option can be toggled off as Ignore Curbs During Auto Jump Generation in the Nav Grid’s properties. Turning this off forces the jump link builder to assume there might be small obstacles up to the nav grid cell height in size in front of the agent when it jumps, which means that jumps must be made at a reasonably steep angle.
In order to ensure that the pawn doesn’t collide with a small bump when jumping, there is a small correction applied to the pawn’s capsule size at take off. The capsule is shrunk in height and then restored to its original size over the course of the jump. This correction is only applied if all of the following are true:
Disabling Shrink Capsule During Auto Jumps but leaving Ignore Curbs During Auto Jump Generation can result in the pawn colliding with small curbs or bumps at take off.
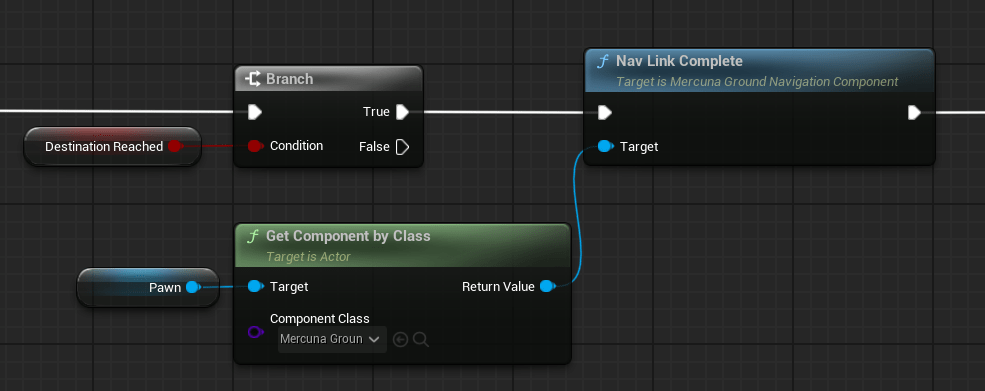
By default, when following a path that contains an automatic jump link, Mercuna uses the CharacterMovementComponent’s Launch function to trigger a jump in order to traverse the link. Once the pawn lands it returns to its normal path following.
Alternatively, users can explicitly handle jump traversal by binding a function to the Navigation Component’s OnJumpStarted delegate. In this case it is gamecode’s responsibility to traverse the jump and then inform Mercuna by calling Nav Link Complete on the navigation component when the jump is finished.
Mercuna provides options for querying and updating automatic jump links at runtime. These are exposed via C++ and through the following Blueprint nodes:
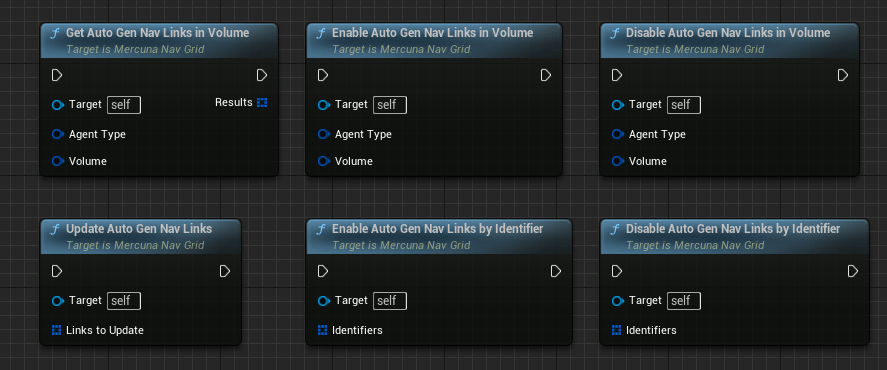
Note that the identifiers returned by Get Auto Gen Nav Links in Volume are only valid until the nav graph is rebuilt and should not be stored long term.
Normally, you will create a blueprint for each type of nav link supported in your game, and then place instances of these blueprints into your levels.
To create a Nav Link blueprint, add a new blueprint class, deriving it from the MercunaNavLink actor. Alternatively, you can add a MercunaNavLinkComponent to a Blueprint or existing actor.
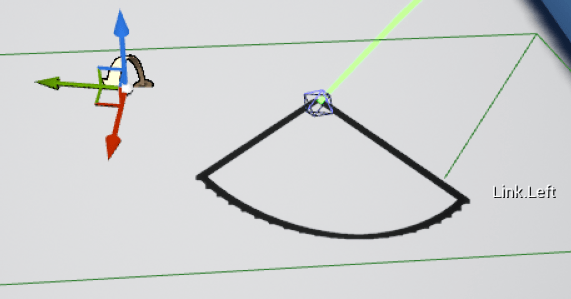
After selecting the nav link actor, you can position the ends of the nav link by clicking on them and then moving them in the normal way.
If you specify a limited Entry Angle range then you can also rotate the end to determine the acceptable range of entry angles, the black arc represents the valid entry angles.
 Cost
CostThe path finder normally considers the cost of moving through the navigable space to be equal to the distance the agent needs to move. For nav links, the cost can be adjusted to make agents prefer to use the link, or prefer not to. By default, the cost is set to the distance between the endpoints.
Note that if the link has a lower cost than the straight line distance, then it will only be used preferentially if the path finder discovers the link during its search. This won’t happen if a straightforward path is available, but the agent would have to go backwards to find the cheaper nav link, for example.
Similarly to Nav Grid Modifier Volumes, usage types can be configured on Nav Links in order to restrict which types of agents can navigate the link. See the Modifier Volumes section of the documentation for full information on setting up Usage Types.
Note that if an agent has a usage type set to Required then that usage type must be set on the nav link for it to be able to use the nav link.
You must specify which agent types the nav link supports. By default, the nav link will be associated with all nav grids that have navigable space at the endpoints of the link, if you want to restrict it to a particular nav grid, you can specify that explicitly by unchecking Apply to All Nav Grids.
Nav links created at runtime are not automatically added to a nav grid. They must be explicitly registered using one of the following functions:
For nav links derived from the Mercuna Nav Link Actor, properties such as link end positions, supported agent types, and traversal costs can be set directly as exposed parameters when the actor is spawned.
If you are using the Mercuna Nav Link Component directly, these properties must be provided as arguments to the relevant Add function when registering the link.
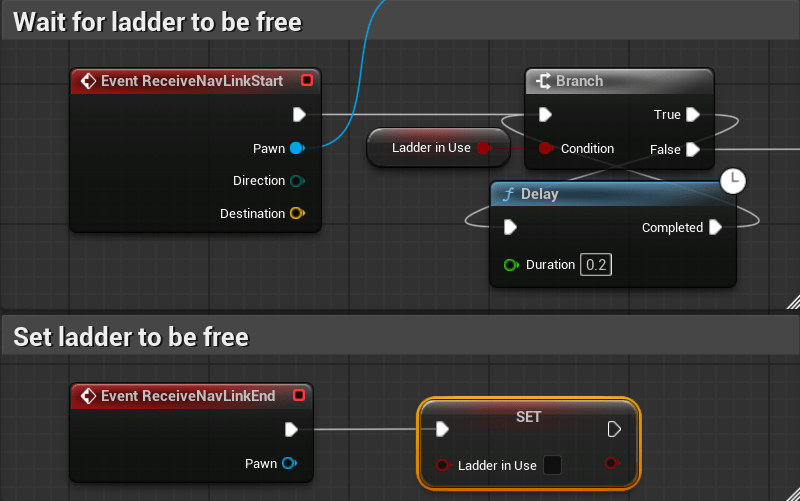
When an agent reaches a manual nav link, Mercuna does not automatically traverse it. Instead, it is the responsibility of your Blueprint or game code to handle the traversal (e.g., playing an animation, moving the pawn to the other end).
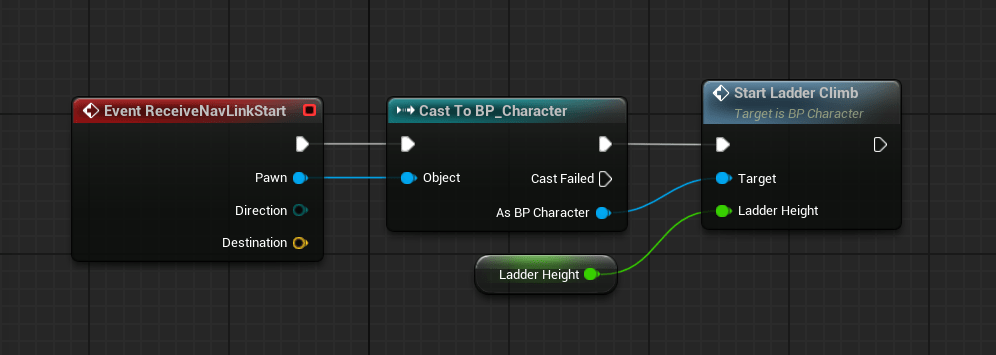
To notify game code when a nav link has been started, Mercuna calls Event ReceiveNavLinkStart on MercunaNavLink actors, and triggers the OnNavLinkStart delegate on the MercunaNavLink component.
Both provide the same information:
When this event or delegate is fired, your traversal code should move the agent toward the destination end of the link, for example by triggering an appropriate animation.
 By default Mercuna will control the rotation of the agent as it traverses the link, rotating it to face the end link point. To manually control the rotation you can disable the Auto Rotation property on the link. It is then the responsibility of game code to control the pawn’s rotation.
Once the traversal is finished, you must signal completion so Mercuna can resume path following. This is done by calling the Nav Link Complete function on the Mercuna Ground Navigation component.
 Alternatively, you can set a non-zero Auto Completion Distance for the destination end of the nav link, if this is set Mercuna will automatically trigger link completion once the agent is within that distance of the destination.
When a link is completed – either manually or automatically – Mercuna calls ReceiveNavLinkEnd on the MercunaNavLink actor and broadcasts OnNavLinkEnd from the MercunaNavLink component. You can use these to clean up state before the agent resumes normal movement.
 Intergrid Nav Links
Intergrid nav links allow different nav grids to be connected together and for pawns to find and use paths that span multiple nav grids. This can be used to allow pawns to path between nav grids at different orientations or onto and over moving platforms.
The nav grids that are connected together must have the same cell sizes and supported agent types.
An intergrid nav link can be setup by placing a normal manual nav link and then:
When the agent reaches the start of the nav link an Event Receive Nav Link Start is called on the Nav Link Blueprint. It is then up to game code to traverse the link. If the destination is a moving object, such as a platform, the traversal logic is responsible for waiting until the platform is in the correct place before jumping or walking on to the platform. Mercuna handles changing the Nav Grid the pawn is assigned to automatically.
Once the nav link has been completed, the function Nav Link Complete should be called on the pawn’s navigation component to inform Mercuna to take back control of moving the pawn.
Mercuna does not support temporal pathfinding. Instead for intergrid links connecting to a moving object, for the purpose of the pathfind search, Mercuna considers the object to be stationary with a fixed link cost. The resulting path therefore does not take into account where the object will be when the pawn reaches the start of the link.
When following a path, it is possible to query a pawn’s next Nav Link using the Get Next Nav Link method on a ground navigation component. This returns whether there is a nav link in the path, how far away it is and properties of the nav link.
In order to give smooth, natural looking movement Mercuna uses polynomial curves to interpolate between path points to generate smooth curves. These splines are constructed taking into account the available space.
Whereas the pathfind is performed when an agent is given a destination, the smooth curve is generated on demand. If the agent is pushed, or has to avoid other actors causing it to move away from the curve, then the curve and, if necessary, the underlying path are automatically regenerated.
Mercuna offers dynamic obstacle avoidance to ensure that pawns don’t collide while moving. Any actor with a Mercuna Obstacle Component is automatically considered as an obstacle that needs to be steered around for the purpose of avoidance. For the purpose of avoidance agents will be treated as circles if the obstacle is a sphere or a cylinder, or as a rectangle for box shaped obstacles such as vehicles (if the rectangle is rotating rapidly it is treated as a circle).
Mercuna offers two different dynamic avoidance methods:
The Avoidance Mode an agent uses can be configured on the Mercuna Ground Navigation Component.
In addition, the Avoidance when Stationary property chooses what to do when no command (i.e. no path) is present. The options are:
The Avoidance Weight Multiplier controls how much this agent will avoid other agents, compared to other agents avoiding it. A higher weight means this agent will deviate less far from its path, while other agents with lower weights will deviate further to move out of its way.
Mercuna’s implementation of Optimal Reciprocal Collision Avoidance (see e.g. https://gamma.cs.unc.edu/ORCA) is a modified velocity obstacle method that additionally takes into account the fixed level geometry stored in the nav grid.
Min Avoidance Time – Can be adjusted to change how early the agents attempt to avoid a collision (shorter times mean the agents move past each other more aggressively). A default avoidance time of around 0.3s is recommended for characters, or 1s for vehicles.
Contextual steering allows agents to perform path following whilst preferring to maintain pre-specified distances from other agents. Through combining the output of various steering contexts each agent attempts to choose a velocity that best satisfies all its contexts’ constraints. Each context either scores a velocity, or marks as excluded (as it would cause a collision).
There are currently 5 contexts that are used:
Agents use a gradient descent method to select the best velocity out of all available (non-excluded) velocities.
Contextual steering can be enabled for an agent via setting the Avoidance Mode property on the Mercuna Ground Navigation component to Context Steering.
Because how an agent reacts is different for each agent it encounters, for example it might want to stay close to allies and far away from enemies, context steering uses a different set of parameters for each agent pair.
These parameters can be set via the following properties on the Ground Navigation Component, from highest preference to least:
The available parameters to control the interactions are:
Sensible ranges for the weights are 0.5 – 2.0, or 0 to disable.
There is a hard-coded maximum search multiple of 100 entity radii for considering neighbours.
The OnGetContextualSteeringParams delegate on the Ground Navigation Component provides a way for game code to set parameters between individual agents, rather than just on an actor type basis. This delegate must be registered from C++, and is not exposed to Blueprint as performance of this delegate is critical.
The delegate should fill in an FMercunaContextualSteeringActorParameters struct which determines how this actor should react to the other actor (that is supplied as a parameter to the delegate).
To avoid making excessive callbacks to the delegate, after the first encounter the parameters are cached on each agent. If you want to change the parameters, then you will need to invalidate the cache. The next time the agent’s encounter each other they will call the delegate again. The invalidation can be done using the functions on the agent’s Ground Navigation Component:
In order to understand how the agent’s velocity is being chosen it is possible to draw the scored velocity field. In the main Mercuna menu, set a debug actor and turn on “Avoidance”.
The values of a sampled velocity field are shown coloured by value (from blue=low, to magenta=high, and white=highest). Excluded velocities (i.e. that would collide with walls) are grey-ed out.
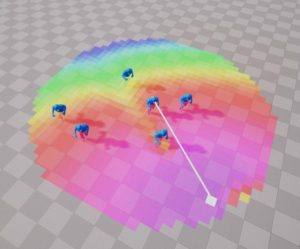 Drawing the velocity requires a regular grid of velocities to be sampled, compared with the usual method of determining the optimum velocity via gradient descent. This sampling of a very large number of velocities can have a notable impact on performance when the debug draw is active.
The white-line indicates the velocity found by a gradient descent algorithm, while the white square is found by the sampling. The latter is only performed to generate this debug draw and may not always match the white line.
When an actor with a Mercuna Obstacle component has stopped moving for more than a short amount of time, Mercuna has the option of cutting them out of the nav grid. Obstacles that have been cut out will be pathed around instead of being treated as a dynamic obstacle.
All paths that go near or through the obstacle that has been cut out will be automatically updated. The advantage of handling stationary obstacles through pathing, rather than dynamic avoidance means that other agents are more reliably able to move around them and won’t get caught in local minima.
 The Cut Out Stationary Obstacles property on the Mercuna Ground Nav Grid controls whether any stationary obstacles can be cut out of that grid.
The time before an obstacle is cut out is controlled by the Stationary Threshold Time on the Mercuna Obstacle component. As soon as the obstacle starts moving it will be removed from the nav grid and once again treated as a dynamic obstacle.
The following functions are available on the Mercuna Ground Navigation Component and can be used to direct an agent to move between goals:
To simplify Blueprint scripting, Mercuna provides standalone variants of MoveToLocation, MoveToLocations, MoveToActor and TrackActor which accept an actor instead of a component.
In addition, standalone Blueprint variants of IsNavigable, ClampToNavigable, Raycast and IsReachable are provided which don’t require a nav graph to be specified and instead choose the best fitting graph to use based on the query location, agent type and other provided parameters.
Make sure to use the Ground Navigation version of the Blueprint functions with Ground agents.
Mercuna Ground Navigation offers four simple EQS tests. These first three of these tests are filters returning whether a point passes or fails, and do not score the points
The fourth available EQS test is:
Additionally, Mercuna offers one EQS test that modifies the positions of the test points:
Mercuna also offers the EQS point generators:
Mercuna’s EQS generators and tests must be run against a specific nav grid and agent type. These are determined either by explicitly specifying an actor type via an agent class, or, if none is given, by using the context actor for the query. In both cases, the chosen actor must either implement the IMercunaNav2DQuerierInterface directly or contain a component that does.
Since the Mercuna Ground Navigation Component implements this interface, any actor with such a component can use Mercuna EQS queries without additional setup.
When using an EQS Testing Pawn, the pawn must provide the correct nav grid and agent type for the query. This can be done by adding a Mercuna Ground Navigation Component to the testing pawn and setting its Agent Type, or by adding a custom component that implements IMercunaNav2DQuerierInterface and returns the required agent type and nav grid.
If you find that your pawn is not moving as expected, or at all, there are several debugging mechanisms available within Mercuna to help quickly identify problems.
Mercuna makes logs to the Unreal logging system to indicate progress and error conditions. By default, only Warning and Error logs are written, to enable progress information add the following to DefaultEngine.ini:
[Core.Log]
LogMercuna=Log
If more information is needed then Editor Preferences > Mercuna > Enable Extra Logging, can be enabled. This option persists between editor restarts. Extra Logging causes Mercuna to output all log messages, including additional debug messages, to a dedicated Mercuna.log file, located in the same directory as the standard Unreal logs.
To enable the Mercuna.log on standalone builds, add the following line to the Engine/Config/ConsoleVariables.ini:
mer.LogToFile=1
Mercuna is integrated with Unreal Engine’s inbuilt profiler. The current amount of time Mercuna is taking to run each frame, as well as the current memory usage, can be seen using the stat Mercuna console command.

If an entry in the profiling list has (Job) after its name, then it is being run as an asynchronous job on a background thread and so will normally have no effect on the frame rate.
Mercuna is also integrated with Unreal Insights and a finer grained performance profile is available through Unreal Insights.
To help understand how the physical world geometry collected by Mercuna to build the nav grid build affects performance, statistics can be logged at the end of the build. Enable this by selecting the Record Geometry Collection Statistics option in the Debug section of the Nav Grid properties.
When enabled, the log includes the number of meshes, total triangles, and time taken to collect each generation box while building the grid, along with the names of the actors with the largest meshes overlapping that box. Note that because meshes are cached when first encountered, the time per box will change depending on the build order, so will not be the same between different builds.
Triangles from the landscape are not included in these statistics as they are collected via an asynchronous method and don’t impact the game thread performance.
All Mercuna memory allocations are tracked and the total memory used by different systems in Mercuna is displayed through stat Mercuna. Note that the Scratch memory usage is a fixed amount per concurrent thread using Mercuna.
When trying to understand the actions of a particular agent, it can be useful to set it as the Mercuna debug actor. This can be done by selecting the agent and setting it as the Mercuna debug actor in the Mercuna toolbar menu. The same menu also allows the debug actor to be cleared.
On screen log messages will be displayed for the Mercuna debug actor and additional debug draw is available.
In Debug builds or if the define MER_DEBUGGING is set, then additional debug logs will also be recorded to Mercuna.log for the debug actor. If you report a movement problem to Mercuna support it is helpful to include these logs and a video capture of the problem.
In order to help understand the current movement of Mercuna controlled actors the following debug draw is available from the Mercuna editor menu:
The actor debug draw can also be viewed through the Gameplay Debugger. This debug draw is replicated in multiplayer setups, allowing the Mercuna state from the server to be viewed by a client.
When any actor debug draw is enabled, Mercuna shows the frame number on screen. This helps correlate video clips with events in the Mercuna log file. The frame number, as well as the actor on-screen log messages can be hidden using the console command mer.DisplayDebugActorLog.
In order to help understand Mercuna’s representation of the geometry for navigation, you can draw the navigation grid, there are the following modes:
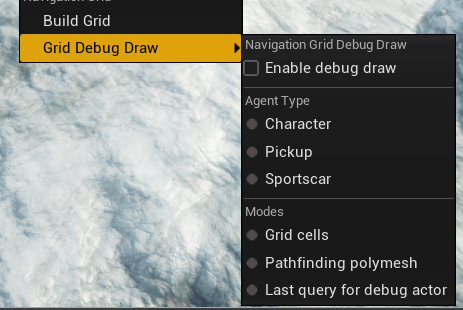 If you only have a single Agent type defined in your project, the navigation properties for this will be automatically displayed, otherwise you will need to select the desired agent type.
When one of the debug draw modes is active, further advanced options are shown at the bottom of the Navigation Debug Draw Menu that allow you to further customize what is drawn.
There are additional debug draw options available via properties on the grid actor. These allow extra information to be drawn such as displaying polygon labels or showing the generation box boundaries.
It is possible to change the visible range of the Nav Grid debug draw using the Draw Distance property on the grid actor. The distance is specified in grid cells. Increasing this distance too much may impact debug draw rendering performance.
You can turn on nav mesh/grid debug draw in a standalone game build using the console commands:
mer.Grid.Draw X – Debug draw Mercuna grid (0 = off, 1 = navigable, 2 = polymesh, 3 = query)
mer.Grid.Draw.Submode X – Debug draw Mercuna grid submode
mer.Grid.Draw.AgentType agentTypeName – Mercuna nav grid debug draw agent type override
Debug draw is compiled out of Performance builds, but this can be changed by uncommenting #define MER_DEBUGGING at the top of MerDefines.h
When building a nav grid on a server, due to the lack of rendering, it can be difficult to check that the grid has been generated correctly. Mercuna therefore allows you to export the grid to an OBJ model file, that can be loaded in any common modelling program (including the Windows inbuilt 3D Viewer), via either the SaveToObjFile Blueprint node or the console command:
mer.Grid.SaveOBJ GridActorName AgentTypeName [Polymesh]
The exported obj file will be saved in the project root directory and named GridActorName.obj.
To make the dependency on Unreal Water optional, Mercuna has been split into two plugins that exist within a Mercuna directory. The previous “Mercuna/Source” directory can now be found in “Mercuna/Mercuna/Source”.
Any local changes will therefore need to be applied to this sub-directory. Unreal will automatically detect and load the plugins from their subdirectories.
The behaviour of GetNavMeshEdges and GetClosestNavMeshEdge has been made consistent – now the functions will consistently return the edge of navigable space, as defined by the provided query params. To clarify this, they have been renamed GetNavigableSpaceEdges and GetClosestNavigableSpaceEdge respectively. Code referring to the old function names will need to be updated.
Queries for generating points or checking the nav mesh within a certain range now consistently have a MaxDistanceIsPathDistance parameter for toggling whether to use straight line distance or distance along the nav mesh for the metric. Ensure that this is set to the value you expect in existing functions and blueprints.
To avoid confusion with newly added functions, the names of ‘Find Path…’ functions on the nav grid actor has been made more descriptive and references to them should be updated:
Mercuna supports Unreal’s water system by a dependency on the Water plugin, which means that on upgrade the Water plugin will be enabled even if you don’t require it. This will cause warnings about unused Water collision: “Collision Profile settings do not include an entry for the Water Body Collision profile, which is required for water collision to function”.
If you do not require Water support and wish to disable the Water plugin, remove the dependency in Mercuna.uplugin, remove the following lines in Source/Mercuna/Mercuna.Build.cs, and then disable the plugin again.
PublicDefinitions.Add(“MERCUNA_WATER_PLUGIN_SUPPORT”);
PrivateDependencyModuleNames.Add(“Water”);
PrivateDependencyModuleNames.Add(“GeometryAlgorithms”);
The arguments to some of the Blueprint query functions on MercunaNavGroundGrid and MercunaNavSurfaceGrid have been renamed as part of standardising naming. Existing Blueprints may need to be manually fixed.
The names of structures related to usage types have been renamed as part of standardising naming:
The names of some function arguments have been updated and remapped to reflect these new names.
The NavLinkTraversalCallback on MercunaNavGroundGrid has been deprecated. Overriding whether a nav link is traversable should instead be done via a custom query filter.
The meaning of setting multiple Usage Types as Required has changed. Previously, this meant all of those usage types were required, now it means that at least one is required. If you require the old behaviour then you can configure the agent to use the All Required Flags query filter example.
A console command “mer.MigrateNavModifierVolumes” is provided to help migrate existing volumes to the new volume type before the next release (see migration section).
Runtime spawned nav volumes and modifier volumes are no longer automatically linked to a nav grid even when the project setting “Auto Link Nav Volumes with Graphs” is enabled. They must now always be explicitly linked by calling AddToGrid.
Old navigation volumes will now be deprecated in v3.4
The Mercuna Nav Modifier Volume actor is being replaced with Mercuna Nav Grid Modifier Volume actor. Both exist and are usable in v3.2 to facilitate migration. The Mercuna Nav Modifier Volume actor will be deprecated in v3.3.
The MercunaNavGrid actor has been renamed MercunaNavGroundGrid.
The start and end position arguments to the Nav Link Traversal callback are now relative to the Nav Grid actor transform.
Due to changes in the way Agent Types are configured, migration from v2.6 back to v2.5 is not supported. If you upgrade to v2.6 and then downgrade back to v2.5 your Agent Type settings will be lost.
The default Mercuna Nav Grid cell size has been changed from 100 to 20, as 20 is a more suitable default for characters. If you have any grids using the default cell size of 100 then these will automatically be changed to use cell size 20 on upgrade. Please check your nav grids if using cell size 100 intentionally (e.g. for vehicle nav grids).
It used to be possible to turn any actor into a Mercuna Nav Seed by adding a Mercuna Nav Seed component. We have retired the seed component, as this allowed some significant performance improvements. Now only Mercuna Nav Seed actors seed the nav grid.
Known engine issues affecting Mercuna:
Known issues in Mercuna Ground Navigation: