Functional tests are a great way to ensure that the basic features of your game work as expected. They allow you to test more realistic scenarios than unit tests whilst giving more control than gameplay tests. This is especially useful for middleware, such as Mercuna, because our 3D and ground navigation systems have many complicated features that are all critical to their success. Fortunately, Unreal Engine 4 provides a neat automation framework that makes it easy to create functional tests.
Preparing your level
Setting up functional test levels is very easy. First of all you should create a separate level for your functional tests. Then make sure to enable the “Functional Testing Editor” plugin within the editor and restart your editor if necessary. Finally, change your level’s game mode to “FunctionalTestGame” – this can be set in World Settings.
Building tests
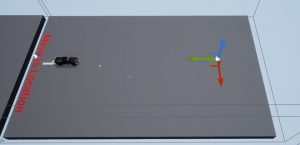
The first thing you should do is place all the relevant actors and assets you need in the level for the behaviour you would like to test. Below is one of our very simple tests which checks that a vehicle can reach the highlighted point on the right using our ground navigation system. We have this test to ensure that the most basic functionality of our system works and that there are no critical problems in our system. It’s also useful, for example, in the case where more complex tests fail, because if we know this basic test fails too, then the problem lies within the basic functionality and not something more complex.

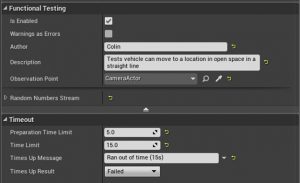
Next, you should add a “Functional Test” actor into your level since the automation framework detects tests by looking for these actors. If you look on the details panel for the Functional Testing actor you’ll see several options.

Most of these options are self-explanatory, but two noteworthy options are the “Observation Point” and timeout settings.
Timeouts are useful for two main reasons. Firstly, they prevent a test running indefinitely and stopping the rest of the tests from running. And secondly, most tests should complete within a certain amount of time and so timeouts can be used to help verify behaviour.
The “Observation Point” allows you to specify an actor from which you can view the test from. This means when you run the tests through the automation framework you’ll be able to view the test from the actor you assigned when the test runs. We use, as recommended by UE4, camera actors as they are much easier to position thanks to having a real-time preview in the editor.
Creating the test blueprint
Now that you have your test set up in the level, it’s time to set up the test logic in blueprint.
There are two ways you can implement the test logic: inside the level blueprint or by deriving a child class of the Functional Test actor class and placing the logic inside the derived class. In Mercuna we currently use the former method as it is simpler to create tests and has been more than sufficient for our needs. If you have complicated tests it will be cleaner to have them self contained in the derived actors, however the downside is that you can no longer see all the test logic in one place, the level blueprint. It’s up to you.
The two important nodes you need are the “On Test Start” event and the “Finish Test” node which come from the Functional Test actor instance you placed. The former is called by the automation framework when it is time to run that test, and the latter you should call when your test logic has decided on a result for the test, so that the test finishes.

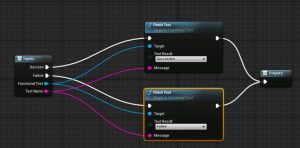
Above is our logic that tests that the vehicle can reach the specified location. It checks if the vehicle arrives within a certain distance of the target location – reporting a success if it does and a failure otherwise. You’ll notice that we have a “Mercuna Finish Test” macro instead of directly using the Functional Test actor’s “Finish Test” node. This is because the testing actor’s node can only report one result, so in order to be able to report a success or failure you would need two of these nodes for every test. We created our own macro to make things simpler.

There are a few other nodes stemming from the Functional Test actor you can use such as “PrepareTest”, however we don’t use them.
Once your tests are all wired up you’ll be able to run them!
Running the tests
You can run your test(s) in the editor through the Session Frontend. To find this go to Window -> Developer Tools -> Session Frontend. In the list, under Project -> Functional Tests, you should see an entry for each of your levels that contain functional tests – with the functional tests inside. The framework looks inside each level in your project for Functional Test actors, and this is how your tests are automatically registered and put in the list. You can manually update the list by clicking “Refresh Tests”.

Select which tests you want to run and then hit “Start Tests” in the toolbar above to run your tests. If all went well you’ll hopefully see a sea of green ticks!

Hopefully you found this article useful! If you have any questions or comments about functional testing or how we do our testing feel free to leave a comment below.

