Mercuna has been designed to be easy to use. This setup guide will help you quickly get Mercuna navigating your agents around your Unity levels. Watch the brief demonstration or follow the instructions below.
If you are using Unreal Engine 4, go to the UE4 Quick Start Guide.
1. Installing the plugin
The Mercuna plugin requires Unity 2021.2 or newer, if you’re using an older version you must upgrade your project first.
To install simply unzip the archive and import the Mercuna package into your game project through the Assets/Import Package/Custom Package menu in the Unity Editor. The plugin will now be loaded automatically when you load your game project.
2. Level Setup
In order for your AI agents to move, a Mercuna Navigation Octree needs to be added to your scenes.
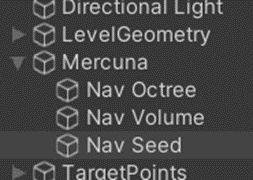
- From the Tools/Mercuna menu select Add Mercuna To Scene. This will add a default Navigation Octree, Navigation Volume and Navigation Seed to your scene. These objects are grouped under the Mercuna singleton object.
- Check the Mercuna Nav Volume is positioned and scaled to encompass all the space you want your AI to navigate within.
- Check the Mercuna Nav Seed is positioned in empty space. Agents can only navigate within parts of the navigable volume that are reachable from a Nav Seed without having to go through any geometry.
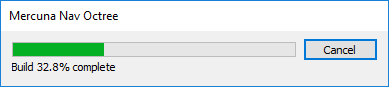
From the Tools/Mercuna menu select Build Octree and wait for generation to complete.
3. Pawn setup
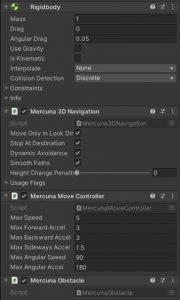
Your AI agents need the following components in order to be fully registered with Mercuna:
- An appropriate Collider component
- A Mercuna 3D Navigation component
- A Rigidbody component
- A Mercuna Move Controller component
- A Mercuna Obstacle component
Adding a Mercuna 3D Navigation component will automatically add the Rigidbody and Move Controller components.
Untick the Use Gravity option on the Rigidbody component.
4. Scripting
Your agents can be ordered to move around using methods on the Mercuna 3D Navigation Component. Here’s a simple example using NavigateToObject to send an agent to a target.
public class NavigateTo : MonoBehaviour
{
   // Set this to an empty object positioned so your agent can move to it.
   public GameObject destination;

   void Start()
   {
      // Request for your agent to navigate to the destination
      GetComponent<Mercuna.Mercuna3DNavigation>().NavigateToObject(destination);
   }
}
Create a new script with the above code, and add it to your agent. Create a new empty object and set it as the destination for your agent.
Now when you enter Play mode, you should see your agent fly to and stop at the destination.
See the Mercuna Unity User Guide for more information on how to configure the Mercuna navigation system, along with details of more advanced uses.