Mercuna has been designed to be easy to use. This setup guide will help you quickly get Mercuna navigating your pawns around your UE4 levels. Watch the brief demonstration or follow the instructions below.
If you are using Unity, go to the Unity Quick Start Guide.
1. Installing the plugin
The Mercuna plugin requires Unreal Engine 4.24 or later, if you’re using an older version you must upgrade your project first.
- The binary evaluation version of Mercuna must be installed as an Engine plugin – unzip the archive and copy the Mercuna directory to the Plugins directory within your Unreal Engine install, e.g. UnrealEngineDir/Engine/Plugins/Mercuna.
- For source versions of Mercuna, it can be used either as a Game plugin or, if you are building the engine from source, as an Engine plugin.
Once installed, the plugin will be loaded automatically when you open your game project.
2. Level Setup
In order for pawns to move, a Mercuna Navigation Octree needs to be added to your levels. By default a Navigation Octree will be automatically created when you add the Mercuna Nav Octree Volume.
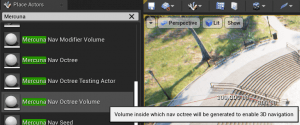
- Drag a Mercuna Nav Octree Volume actor into your level and resize the box to surround the entire level.
- Drag a Mercuna Nav Seed into your level and ensure it is placed in empty space (i.e. not inside any walls or the floor).
- From the Mercuna menu select Build Octree and wait for generation to complete.
3. Pawn setup
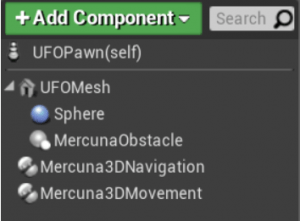
Your AI pawns need the following additional components in order to be registered with Mercuna:
- Mercuna3DNavigation component
- Mercuna3DMovement component
- MercunaObstacle component (this must be a child of the root scene component)
On any mesh or collision components, under their Collision properties, ensure that “Can Ever Affect Navigation” is unchecked (this stops the pawn being considered as a static object in the navigation octree)
4. Setup Blueprint commands
Your pawns can be ordered to move around using Blueprint commands. A simple example of using a Mercuna | 3D Navigation | Move to Actor task in the Level Blueprint to send a pawn to a target point is shown below.
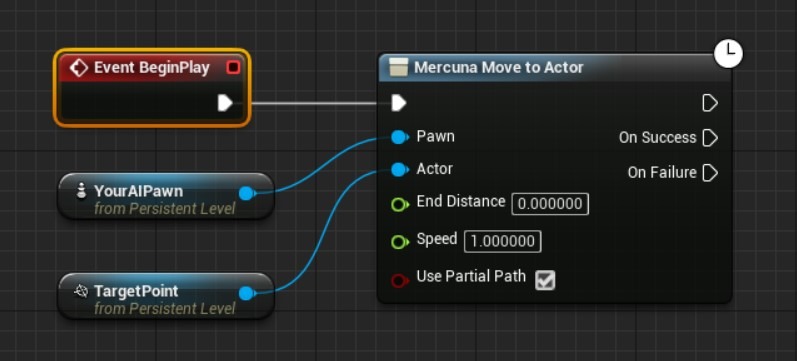
Now when you enter Play mode, you should see your pawn fly to the target point and stop there.
See the Mercuna 3D Navigation UE4 User Guide for more information on how to configure the Mercuna navigation system, along with details of more advanced uses.